Showing posts with label Vegetable. Show all posts

Friday, August 28, 2015

Zucchini - Tarte


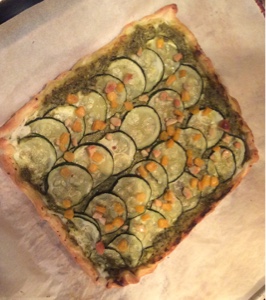
I have a new favorite Cookbook: "the Forest feast" from Erin Gleeson. On every page there is a tremendous recipe, easy to make, not to many ingredients and mouthwatering pictures and drawings. So  I already tried some of the recipe. One of them is a sort of Tarte with little yellow pumpkins. As I couldn't find some small pumpkins I did the Tarte with zucchini. The result was great! And here is the recipe....


You need (serves 2):
1 puff pastrie 
1 small zucchini 
1glass Italian Pesto Genovese 
100 g Ricotta
A handful, roughly crashed cashews and some sweet corn
Some salt and a good lug of olive oil

To prepare:
1. Preheat the oven to 200 C.
2. Cut the Zucchini in thin slices.
3. Roll,the puff pastrie to a square. Smear on it the ricotta and then the pesto.
4. Place the Zucchini slices on the pesto, disperse all over the nuts and sweet corn and fold in the edges.
5. Season with a little bit salt and sprinkle all over some olive oil.
6. Transfer the Tarte on a baking tray armed with some parchment paper and bake in the preheated oven for about 30 minutes until golden brown. 

Enjoy warm or cold, with some salad as side dish, also delicious when cut in small pieces to accompain a after work Drink.... 


Sunday, May 17, 2015

Vegeterian Casserole with potatoes, zucchini and tomatoes


Springtime... Everywhere one can find the first fresh fruits, vegetables.... Your jogging shoes are looking at you and saying "when will be used again?"
And of course beneath the willingness to make more sport you decide also to eat more vegetables, more healthy,.... This Vegetable-Potatoe Casserole is easy to made, can be varied in many ways, is also adaptable for vegan (you've simply to omit the cheese) and is so tasty!
You need (per Person):
- 1 big potatoe cut in medium thick slices (don not peel the potatoes)
- 1 small zucchini cut in slices 
- 1 onion cut in rings
- 1 - 2 Tomatoes cut in not to thin slices 
- 1 garlic glove, roughly cut in cubes 
- Some fresh thyme 
- 3 - 4 bay leaves 
- 30 g Feta cheese 
- 50 ml vegetable stock
- salt and pepper as well as some olive oil
- if you want some sesam seeds or black onion seeds 

To prepare:
1. Wash the vegetables and cut them in slices, prepare the garlic and the onion
2. Preheat the oven to 200 C
3. Grease with some olive oil a baking dish
4. Put the vegetables and the bay leaves in rows in the baking dish, season with some salt and pepper, pour the vegetable stock over the vegetables, sparkle some seeds all over and to finish drizzle all over some olive oil and some fresh thyme


5. Bake for 30 minutes in the preheated oven, then add the feta cheese and bake for further 10 minutes.

6. After 40 minutes control with a fork if the potatoes are ready or if you have to add some minutes more baking time ( depending on the thickness of the potatoe slices you have to adjust the baking time ; could be a little bit shorter or a little bit longer)

ATTENTION: right out of the oven th dish is very hot! Serve with some baguette (fresh or roasted) and for those who need some meat... this veggies are perfect with some grilled steak or whatever you like !


Sunday, August 10, 2014

Burrata with roasted vegetables


During Summer to find some light dishes apart from Salads is not so easy... Ok one may grill or eat Pasta, fruits and icecream to get in the right summermood... But during Summer also all the vegetables are ripe and smelling and available in abondance... So find here a recipe that combines the taste from ripe vegetables with some italian taste.
You need (for 2):


250 g tomatoes
1 Zucchini 
1tbsp. icing sugar 
1 tbsp. normal sugar
2 garlic gloves, cut in small cubes
Some good olive oil
Different Herbs as thyme, rosemary, basil (I used dryed one as they are ready to use... But feel free to use fresh one)
Salt and pepper
1 Burrata

To prepare:
1. Roughly cut tomatoes and Zucchini 
2. Mix the vegetables with sugar, a good lug of olive oil, herbs, salt and pepper
3. Disperse the icing sugar on a oven tray and put the vegetables on this tray
4. Roast the vegetables for about 2 hours in the to 110 C preheated oven 
5. Put the Burrata out of the fridge at least half an Hour before the vegetables are finished


6. Let cool down the vegetables for about 15 minutes so that are still warm but norm more hot. Put them in a deep plate and Place for each Person half of the Burrata on Thor of the vegetables. To finish sprinkle with a little bit of oilve oil.
Oh by the way when you open the oven you will smell an mouthwatering Odour....... So it might be quite hard to wait some minutes before eating ;)


Thursday, March 6, 2014

Springrolls to go


This is a different way for springrolls as we mainly know them... Most of the time we associate with springrolls, hot rolls, fried in oil filled with meat or vegetables. Here is a recipe for quick done rolls and perfect to take away..... In fact you can fill them with quite any vegetables you like. I choosed a ready made mix from different vegetables cut in Julienne, that I found at the supermarket (I think normally this mix is intended for soups...), added some green beans (left over in my fridge...) and... Here is the recipe....

You need (for 6 rolls):


- 6 Ricepaper
- 100 g Rice noodles
- 2 tbsp. Peanuts
- 6 tbsp. of different vegetables (as carrots, celery...) cut in Fine Julienne
- 50 g green beans
- 4 tbsp. Wok seasoning sauce or a soy sauce
- some olive oil, raz-El-Hanout spice
A clean but lightly wet kitchen towel

To prepare:
1. In a bowl with lukewarm water soak your rice noodles for some minutes, then drain and season with soy Sauce or Wok seasoning Sauce


2. In a pan heat up some oilve oil, add raz-El-Hanout and the Peanuts. Roast for some minutes 


3. Heat up some water, add the green beans and cook for 3 minutes. Drain, cut in small pieces
4. In another bowl with some lukewarm water, big enough to put in the bowl one Ricepaper after the other, soak for a short minute one ricepaper. Put the Ricepaper out of the water and lay on a wet kitchen towel
5. Put your seasoned rice noodles on the lower part of the Ricepaper, top with the finely cut vegetables and peanuts


6. Fold both sides towards the middle and start rolling the Ricepaper


And you' ve yet finished!!! This rolls are really pretty to take away for "Business" Lunch or a picknick and can be filled up to your creativity...


Wednesday, February 26, 2014

Salad to Go with roasted Chickpeas and Yoghurt Dressing


Recipes for Take away treats are not so easy to find as it is not so easy to prepare things in advance and be sure that it will taste fine the next day..... In the morning I am to busy and also not enough awake ;) to prepare a dish for taking to the Office .... This salad is easy, perfect to prepare and deliccious!
You need (for 2 pers):
- 1 tin  Chickpeas, ready to use (275 g Net Weight)
- 1 ripe Avocado 
- 1 tbsp. Lemon juice
- 1 tbsp. Olive oil + 1 tsp. smoked sweet Paprika powder (Pimenton de la Vera for ex.) + a pinch Berbere + 1/4 tsp. Zataar.
- Mixed Green Salad 
- 6 tbsp. Soy Yoghurt + 2 tbsp. Olive oil + 1 tbsp. white wine Vinegar + 1 tsp. Mustard for the salad Dressing + salt and pepper


 To prepare:
1. In a pan heat up 1 tbsp. Olive oil and roast for a short moment Paprika, Berbere and Zaatar before adding the drained chickpeas. Stir all the Ingrediens and continue roasting for about 4 minutes until all the Chickpeas are well covered by the spices.
2. Meanwhile put all the ingredients for the salad Sauce in a small jar that you can cover with a good fitting lid and shake well until all is well combined. Reserve in the fridge until You intend to eat your salad as I recommend to pour the Dressing over the salad some minutes before you eat.
3. Cut the Avocado in slices and drizzle some lemon juice over to avoid that the Avocado turns brown.
4. In a take away dish put your salad and the Avocado and Reserve in the Fridge until serving.
5. After cooling down, put the roasted Chickpeas in a glass and reserve also until you intend to savour your salad. This Way the Chickpeas will stay crunchy.
6. So you have to take with you the salad, the Dressing and the Chickpeas and to adjust your meal reiht before you intend to have your Lunch or Dinner or whatever..... I pour the Dressing over the green salad, mix it well, then lay the Avocado on the salad and finish with the roasted Chickpeas.



Sunday, February 23, 2014

Portobellos filled with Couscous


Long time I thought that Portobello is only a City in Italy since I discovered a sort of champignons named also Portobello. This are Special Champignons that are quite big and are ideal to be filled or to be grilled. As the "grill season" yet is not started, even if at the moment it seems that winter is over and springtime, I choosed a recipe for filling the Portobellos. As ever it's simple and quick done... The only workload is the preparation of the vegetables...so if you can found ready cut ones...take them... I did it :). Those filled Portobellos can be eaten as main course or as side dish or with a little salad.....

You will need (for 2 persons if served as Main course):


- 6 Portobellos 
- 5 Tbsp. ready cooked Couscous 
- 3 Tbsp. of different varieties of carrots and Spring Orion cut in small cubes 
- 100 ml SoyCream for cooking
- 1/4 tsp. Harissa paste
- salt and pepper to season and little bit olive oil
- Guacamole to accompaign the Champignons (I bought a ready prepared one)


To prepare:
1. Clean the Champignons with a brush. Remove the fungus stipe and cut them finely.
2. Preheat in a pan some olive oil and sweat the carrots. Then add the cut Fungus stipes. 


Remove from the heat. Add Couscous and soy cream and season with salt, pepper and harissa.


3. Preheat the oven to 180 C.
4. Fill the Portobellos with the Couscous-Vegetable mix and top with a little bit butter. 


5. Put in a oven prooved disch and bake in the preheated oven for about 20 minutes... And then Serve..... Enjoy.....


Thursday, February 6, 2014

Spicy Roasted Butternut Squash with Rice


This is a very easy and quick done dish for all loving pumpkins. You only have to cut the pumpkin in wedges, put in a plastic bag with spices and some oil, shake it and then up on a  baking-tray and in the hot oven.... Sounds easy? It is easy! ;)
You need ( for 2 - 3 portions)
400 - 500 g butternut squash or any pumpkin you like, cut in wedges about 1,5 cm thick


1 tsp. Fleur de sel
1/2 tsp. sweet paprika powder
1/2 tsp. freshly ground black pepper
1/2 tsp. mild curry powder
1 tsp. dried wild oregano (if available you can also use fresh thyme and rosemary finely cut)
2 tbsp. Olive oil
1 cup of rice (I used a special rice that turnes violet when cooked. This looks pretty in contrast to the colour of the butternut squash...) and 2 cup water seasoned with a little bit salt

To prepare:
1. Preheat your fan oven to 220 C 
2. Put the pumpkin wedges in a bag with all the other ingredients and shake it until all the wedges are covered with the spices


3. Start cooking your rice for about 20 minutes
4. Put the wedges on a baking tray armed with some parchment paper for about 15 minutes until soft but also partly crispy


(depending on the thickness of your wedges the cooking time may be longer or shorter...) 


Serve together with the rice and enjoy!


Monday, January 27, 2014

Vegan Pumpkin-Chickpea Stew


For a long time I did'nt like to prepare dishes with pumpkins because I hated to cut them (realy a hard work and one need a very sharp knife...) and because I tought that I had also to peel them, what meant that it tooked a quite long time to prepare the dish. But I discovered that very often it is not necessary to peel the pumpkin. So the workload is reduced to cut the pumpkin..... And now I love dishes with pumpkins. The following recipe is one adpated from Haya Molcho and is apart the cutting of the pumpkin really quick prepared.


You need (serves 3-4 persons):
500 g Pumpkin (Hokkaido or butternut or wich one ever you may like) It does'nt matter if you take a little bit more or less....
1 Cinnamon stick


2 bay leaves 
400 g chickpeas ( I used canned one, ready to be prepared)
140 g tomatoe puree
1 Onion, cut in slices
1 garlic glove, cut in slices
1 organic Lemon, cut in small rounds
4 crushed pimento
500 ml water
Some olive oil, salt and pepper to season

To prepare:
1. Wash your pumkin and then cut your pumkin in wedges.


2. Heat up in a deep pan some olive oil and cook the onion until lightly brown then add the garlic and continue cooking for a minute.
3. Now add all the other ingredients and stir well


4. Heat up all and then let simmer for about 20 minutes (until the pumpkin is soft but still ) in your pan covered with a lid, stir from time to time


5. Take out the cinnamon stick, the bay leaves and the lemon-pieces and season wirh salt and pepper


It's time to eat! Serve with some baguette or some Naan bread or..... Simply savour !

Wednesday, January 22, 2014

Vegan shitake - rice noodle wok


Always looking for some new vegan recipes and also for something not using always tofu".. ( but hey this would be an idea... To this shitake - rice noodle wok one could add some tofu cut in cubes and crispy fried... Will try it some day...) I found an attracting recipe in the book "peace food". I adapted it a little bit as I am not such a great fan from ginger and I am allergic to pepper.... But see yourself...
You need: (for 2 persons)
100 g rice noodles
150 g spinach leaves
100 g soy sprouts 
120 g shitake mushrooms (cut in medium size peaces when bigger mushrooms)
2 - 3 green onions cut in 1 cm slices
Some sesame oil and some wok sauce, salt and pepper


To prepare:
1. In a wok pan heat up a good lug of sesame oil and a little bit wok sauce ( about 1 tbsp.)
2. Prepare your rice noodles according the indication on the package (I used some noodles that I only had to pour over with some boiled water and wait for 1 minutes. Then I drained them and added them to the wok after the spinach leaves)
3. Roast for some minutes all the prepared vegetables excepted the spinach leaves. Stir regularly
4. Add the spinach and continue stirring for some further minutes. Then add the prepared rice noodles, a good lug of wok sauce, according to your taste, and mix all well... And now it's ready for serving....


Wednesday, January 15, 2014

Vegan lentil Curry


Lentils: you like them or you hate them. For a long time I did'nt like them but retrospectively I think it was because of the way they were cooked. And looking closer to lentils one will discover that there is quite a great variety of lentils not only regarding the colours (you can find brown, black, green, orange..) but also regarding their taste and the time to cook them. For this recipe I used a prepared mix of different lentils having all the some time to get ready and without the need for soaking in some water hours before. The easiest and quickest way would Bye using orange lentils..so take your choice.
You need (serves 2 persons):
150 g lentils 
1/2 tsp. Curry powder
300 ml vegetable stock
200 ml coconutmilk (I prefere using the fat reduced one)
100 g Zucchini (cut in slices)
100 g carrots (cut in slices or in stripes)
Some bambou sprouts (amount up to you; the more you use the more it becomes an asiatic touch)
Some olive oil, salt and pepper
As side dish: some rice
To prepare:
1. In a good lug of heated olive oil roast the lentils, add the curry powder and the vegetable stock. Cook the lentils according the indicated time from the producer (orange lentils take shorter than others. My mix took about 30 minutes). Season wtih salt and pepper.


2. In a pan heat up some olive oil and add the carrots and some spoons of the coconut milk, cover with a lid and cook for some minutes before adding the zucchini and bambou sprouts. Let simmer for about 5 minutes before adding the rest of the coconut milk. (If you want as side dish some rice don't forget to start cooking it !)


3. When vegetables are cooked but almost a little bit crunchy add your lentil mix.


Thats it, were ready! Serve with some rice and ENJOY!


Related Posts Plugin for WordPress, Blogger...